Headlamp Switch-Removal
How to replace the Headlamp Switch:
part # Mopar 04565321AD HEADLAMP SWITCH
1. Remove Dash/Upper Instrument Panel
2. Lower Steering Wheel to the far bottom position
3. Push down at the back of the dash near the windshield and have someone else pull on the front of the dash near the left edge. When pulled out slightly, repeat on the opposite right side. Lift dash up slightly and remove from the car
4. Locate the Headlamp Switch behind the headlamp knob
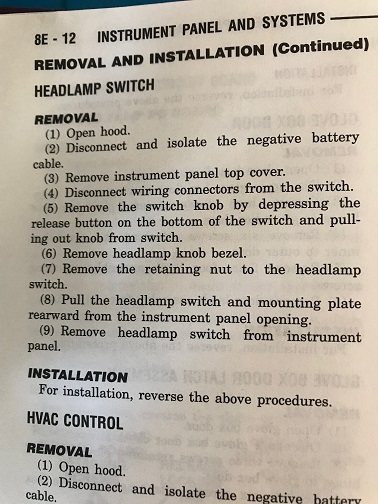
5. Unplug the RED wire harness connector safely
6. Unplug the BLUE wire harness connector from Low Tire Pressure Warning Module safely
7. Unplug BLACK wire harness connector from the top of the headlamp switch by releasing the two snap-on hooks (one on the rear-left and one at the front-right side) of the connector
8. To release the headlamp switch shaft/knob locate the release button at the bottom of the headlamp switch
9. Move larger L-shaped screwdriver or Allen key on the left side underneath the headlamp switch
10. Press the spring release button by pulling the screwdriver or Allen key upwards and remove safely headlamp switch shaft by pulling on the shaft/knob
11. Save headlamp switch shaft/knob for reinstallation
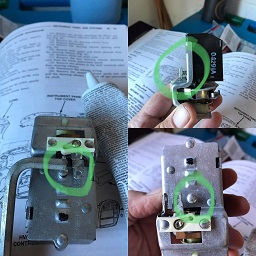
12. Remove/unsnap the plastic headlamp switch bezel carefully, but snap-on hooks may will break taking it off. The bezel must be removed to get to the Headlamp Switch spanner nut
13. Save headlamp switch bezel for reinstallation
14. Locate Headlamp Switch spanner nut behind the dashboard
15. Remove the spanner nut that secures the headlamp switch in place
16. Move headlamp switch slightly up
17. Unplug BLACK wire harness connector at bottom of the Headlamp Switch safely
18. Remove Headlamp Switch from dashboard complete
19. Done!!! YEAH!
20. Install new Headlamp Switch in reverse order
Here’s some additional comments on replacing this switch.
1) The service manual tells you WHAT to do, just not HOW to do it (picture attached).
2) Open the driver window and put down the top before disconnecting the battery, You may need the extra space for working.
3a) Don’t bother removing the panel under the steering column, or the fuse cover. You can’t see or get to squat from these openings. You have to go through the top of the dash.
3b) Don’t try using mirrors, even the little dental ones, to see what you’re doing. They don’t help.
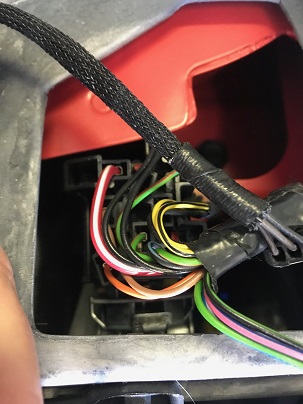
4a) Looking down through the windshield at the harness connector, I saw three little red latches and figured I needed to be an octopus to hold all three latches back and pull up on the wires (picture attached, circled in red).
4b) Nope, the red latches help line up the electrical connections on the bottom. The latches which actually hold the connector to the switch are located on the left and right sides (picture attached, circled in green) and come loose easily with a flat head screwdriver. The harness then easily pops up and away.
4c) There’s a 2 wire connection on the right underside. If you can’t loosen it by prying on the back of it with a flat head screwdriver, you can flip the switch over after you’ve loosened it and remove the connection.
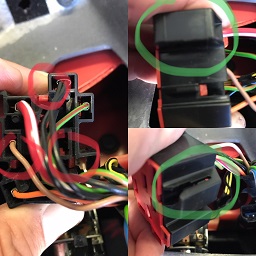
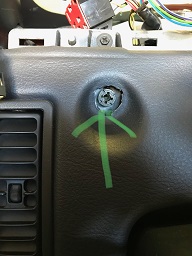
5a) What dope fiend engineer put the release button for the switch knob UNDER the switch where you can’t see it, nor get a finger on it due to the limited workspace? I say we find that guy and give him a stern talking to 😉
5b) Someone suggested using a flat screwdriver to get to the button. It might have been the same person who put it on the bottom. What worked for me is a) seeing exactly where it is, and b) using a decent sized Allen-wrench to get to it from the left side (pictures attached).
5c) You have to get to it from the left side because the right side has that electrical connection (and connectors) in the way. Once you find it by feeling around and pull up on the Allen-wrench, the knob comes right out.
6a) The manual’s step
(7) says remove the retaining nut. What retaining nut????? I don’t see any stinking retaining nut!
6b) So, there it is, behind my broken bezel, accessible through the front of the dashboard (yes, another picture)! Now, can I remove the retaining nut without dropping it into the dashboard void, never to be seen again?
6c) I used some thin cardboard and put it under the nut before removing it, so as to catch it. It appears though that I didn’t need it, as the nut stayed in place while the switch fell away from it.
7) The switch then easily came out, the new one installed quickly, and the wires reconnected easily (I put the underside one on before installing the switch).