Side View Mirrors
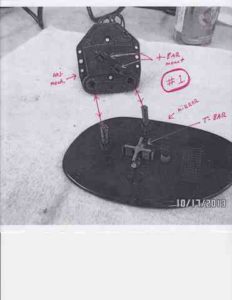
1. REMOVE the mirror from the adjusting mechanism. Manually push the bottom of the mirror in, and using your fingers, pry the top outward until it pops out. There will be a lot of clicking sounds when manually moving the mirror, but thatÕs OK. It WILL come out. On the back of the mirror, you will see two screw drive posts. These post fit into the two motor driven drive gears in the drive mech. Also, you will see a metal T-Bar that mates up with a T-Bar mount. This holds the mirror to the drive mech.(Fig. #1)
2. REMOVE the adjustment mechanism. It’s held in place by three #10 star head screws.
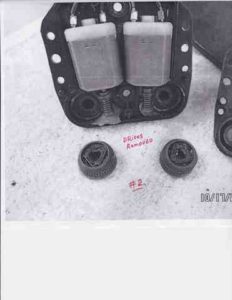
3. OPEN the adj. mech by removing the three small Phillips screws. You will see two motors and two mirror drive gears. (Fig. 2)
4. CLEAN the drives, and inspect to make sure the drives are not broken. The drive gears consist of a simple three segment plastic screw post. These posts get worn and loose their tension over the years, but rarely actually break off. Fig. 3)
If they are broken, buy another unit.

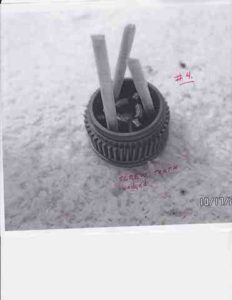
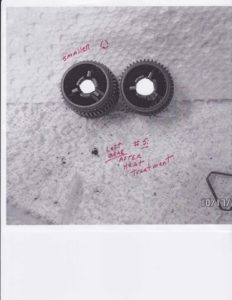
4. WEDGE something (I used broken tooth picks) behind the drive posts to force then inward, making the area that the mirror post fit in smaller. While the wedges are in place, using a heat gun, or hair dryer, heat the entire gear. NOTE: Be very careful with the heat. Heat it, let it cool and check the size of the opening. If it’s visibly smaller, (Fig. 5.) stop heating. If it looks the same, heat it up a little longer and check again.
5. TRIANGLE retainers- The retainers should be reinstalled. They help maintain the pressure the screw posts need to keep the mirror in adjustment.
6. INSTALL – reverse the removal procedure. NOTE: If you remember the mirror was hard to remove, now it will be REALLY hard to put back on. But thatÕs a good thing. After you press the mirror back in, manually push the bottom all the way in, and using a flashlight, make sure the T-Bar has mated with the receiver slots.